The First Stage of Cannabis Flowering: A Practical Guide to the 12/12 Transition and the “Stretch”
Welcome everyone to this new article on the first phase of cannabis flowering! In our last appointment, we took a quick and general look at the most frequent topics and doubts when it comes to cannabis flowering. Today, however, we want to make a real leap in quality and analyze the very first phase of this cycle in meticulous detail. This is a crucial moment, a true watershed that will decide whether your plants will produce meager buds or an abundant harvest, dense and overflowing with resin!
Many growers think that once the lights are switched, the job is done and all that’s left is to wait. Nothing could be further from the truth. The first few weeks are when the plant experiences a true internal revolution, changing its metabolism and the way it consumes resources. Knowing how to interpret its needs at this precise moment will save you a lot of headaches and guarantee the maximum from your genetics.

Dividing Cannabis Flowering into Two Parts: Why Is It Crucial?
You might be wondering why we wanted to clearly divide cannabis flowering into two parts. The answer is simple: from a biological and nutritional standpoint, the plant faces two completely different stages that require a customized approach. Treating the entire cycle the same way is one of those typical beginner mistakes that crush yields right from the start.
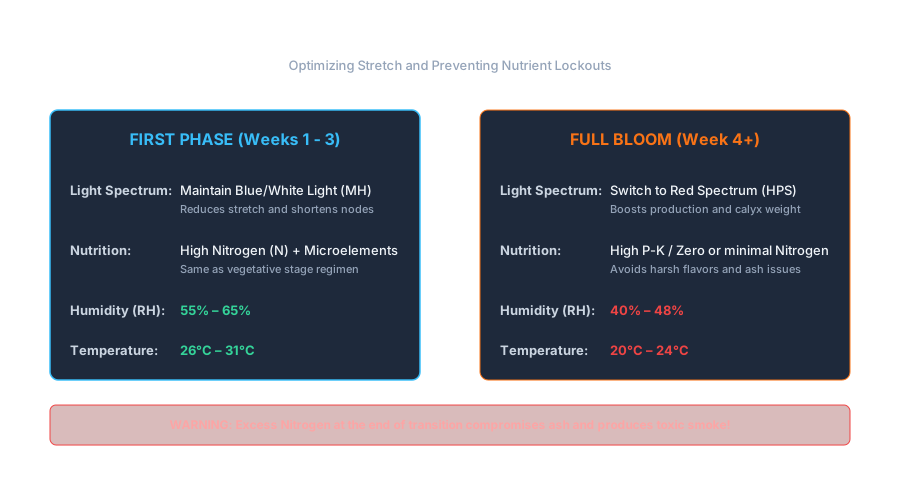
Let’s look at the matter from the feeding side. During the first stage, the plant undergoes accelerated growth. For this reason, it will still have a massive need for a high level of nitrogen. Without nitrogen in this phase, the structure quickly yellows, and the necessary strength to support future flowers fails to develop. Only in the second phase of flowering will the plants stop growing in height and begin to require much more phosphorus and potassium, reducing the demand for nitrogen to nearly zero.
Then there is the climate factor. In the first phase, cannabis still needs a relatively high relative humidity (around 60-65%) and a stable temperature, ideally above 25°C and up to 28-30°C at peak times. This serves to stimulate transpiration and help it push nutrients from the roots to the growing tops. In the final phase, conversely, humidity and temperatures must be lowered drastically. This shift serves to prevent the appearance of destructive molds like botrytis or pest infestations that love the humid climate within compact buds. If we do not acknowledge the existence of these two different phases, problems with marijuana cultivation are guaranteed.

How Long Does the First Phase of Cannabis Flowering Last?
In this first phase, cannabis will try to stretch upward with impressive force. This is the stretch, the unmistakable sign that full bloom is just around the corner! But how long exactly does this period last, and when should we start modifying parameters in view of the next phase?
The first phase of flowering begins exactly after changing the timer of the indoor grow lights, switching to the classic cycle of 12 hours of light and 12 hours of darkness. As for outdoor cultivation, the transition is smoother and more natural: we notice it when the plants clearly begin to show the first pre-flowers (the classic white hairs) on every branch node. This transition period concludes about 3–5 weeks after the switch for those who wish to learn to grow indoors (Indica strains stop sooner, Sativas continue longer) and 4–7 weeks later for those growing outdoors.
That is why it is of vital importance to maintain the parameters of the vegetative stage during the first two weeks of flowering. Remember that cannabis plants do not change their needs overnight: they take their time, and eliminating nitrogen or immediately providing a flowering booster in the first days will do nothing but throw the plant into a lockout or cause it to lose its lower fan leaves too early.
Cannabis grow Management Techniques for the First Phase of Flowering
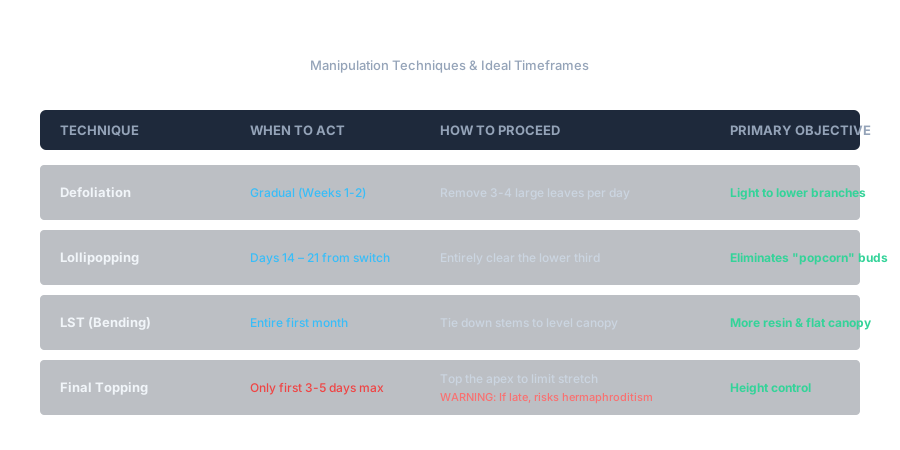
During the stretch of the first few weeks, you can opt for different grow management techniques depending on the space you have available and the goal you want to achieve. In this precise moment, in fact, it is still possible to apply tricks like defoliation, Lollipopping, the final strategic prune, or classic LST (Low Stress Training). Much will also depend on the experience you have accumulated over past cycles, but let’s look at these techniques together in greater depth to understand how to use them to your advantage without causing damage.
Defoliation Technique in the First Phase of Cannabis Flowering
The defoliation technique is fantastic if used wisely, because it allows light to penetrate directly into the lower part of the plant. Normally, the lower section only develops a few small inflorescences (the so-called popcorn buds), which remain empty, lacking substance, and containing very few terpenes and active ingredients due to the shade.
If executed at the right time, this technique allows you to achieve excellent results and compact buds even in the lower parts! The secret of the most experienced growers on forums is gradualness: it will be enough to remove 3 or 4 fan leaves a day for about ten days, focusing on the largest ones that cover the bud sites below. By doing so, you will not subject the plant to massive stress that would halt its growth, but you will help it better distribute light energy.
The Lollipop Technique (Lollipopping)
Contrary to simple defoliation, the Lollipop technique goes straight to the point: it completely eliminates all the lower branches and small shoots in the shade to concentrate all the plant’s energy and sap exclusively on the high, main flowers.
It is generally performed around the second or third week from the switch. It will be enough to remove the weak twigs of the lower third of the plant manually or with sterilized scissors. In this way, you will leave only the highest sites exposed to the light, which are better positioned and have the highest potential, transforming the branches into true heavy bats.

LST Technique in the First Phase of Flowering
By Low Stress Training, we mean the gentle bending of the stem and branches of the plant using cords or hooks, in order to expose even the lowest branches at the same height and create a perfectly flat canopy.
However, it is also true that in grower communities, various combined practices are commonly included under the name of LST, including light defoliation. This is because targeted manipulation and removal of a few leaves cause a very light, beneficial stress to the plants, pushing them to react by producing more trichomes and more resin to defend themselves from external agents. The result? Stickier flowers loaded with aromas.
Final Apical Pruning (Topping)
The final pruning of the main stem, if carried out right at the beginning of the first phase of flowering (within the very first days of the switch), helps keep the plants shorter, more manageable, and bushier, curbing the wild stretch of certain genetics. Be very careful not to do it too late, though! If you perform an apical pruning (Topping) after the second week, when the plant has already begun structuring its calyxes, you will destroy primary hormone production, leaving you disappointed with a meager harvest and stressed plants that even risk becoming hermaphrodites.

Proper Feeding and Parameters to Avoid Risking Lockout
In this early cannabis flowering phase, plants will require almost the same doses of fertilizer as the vegetative period. The amount of phosphorus, potassium, and microelements should be increased very gradually, while slowly lowering that of nitrogen, week after week of the cannabis bloom.
If you are growing with organic (bio) fertilizers, the last heavy vegetative feeding can be given right around the light change, since the soil takes a few days to make it available. If you use mineral fertilizers, however, the response is immediate, and you must be even more careful never to exceed the dosage recommended by the manufacturer. There is indeed a very high risk of over-fertilization (overfert) due to salts accumulating in the roots, resulting in growth stunting, “clawed” leaves, or, in the worst-case scenario, the death of the plant.
The ambient temperature should hover stably around 26-31°C, very similar to the vegetative phase, especially if you use new-generation LED grow lights. Humidity is also a parameter that will remain virtually unchanged from growth during these first 3 weeks (around 55-65%), as the plant is still pushing hard with its roots and needs to transpire without accumulating excessive heat.
Tips and Tricks of the Trade
Have you noticed that your cannabis plants were already too tall even before changing the light cycle? Or did you forget to make the switch on time and now the grow room has become an unmanageable jungle? For this type of problem, which is common on forums, there can be an excellent palliative measure that limits damage, based on managing the light spectrum.
Many make the mistake of mounting an HPS lamp or turning on the fully red spectrum of the LEDs as soon as they flip the timer to 12/12. The red spectrum stimulates internodal stretching. Conversely, if you maintain a white/blue light lamp (MH lamp or the vegetative spectrum of the LEDs) for the first two or three weeks of the switch, the plants will remain much shorter, more compact, and bushier. This is because the blue spectrum tells the plant not to stretch pointlessly, keeping the flower sites close to one another.
Finally, a vital recommendation: absolutely avoid giving too much nitrogen in the final part of the first phase of flowering. Cannabis plants do not stop requiring it all at once, but they want less and less of it. Any trace of mineral nitrogen accumulated inside the flower tissues, besides completely ruining the taste and scratching the throat, ruins combustion.
On a chemical level, the combustion of unwashed residual nitrates releases toxic smoke and carcinogenic compounds harmful to health, leaving behind that typical hard, black ash that sparks and won’t stay lit. It is therefore highly recommended to start calibrating nutrients from the very beginning, paving the way for an impeccable final root flush (flushing) to obtain a final product that is pure, smooth on the palate, and yields the white ash that all growers love.

And that is all for today, keep following us to learn more about the final stage of cannabis flowering!
Greetings from the Annibale Seedshop team!
Davide, CEO Founder & Geneticist