Cannabis Flowering: A Week-by-Week Guide
Welcome back to another update from the Annibale Seedshop informative blog! Today, we will cover one of the most exciting and aesthetically rewarding journeys for every grower: the Cannabis flowering stage, analyzed week by week.
After understanding the crucial importance of germination stage and vegetative growth, it is time to look in detail at what happens inside the grow room (or outdoors) when the plants finally begin to produce the long-awaited buds. Each week brings specific nutritional needs and climate parameters: let’s discover together how to manage them best to avoid fatal mistakes right at the finish line.

The Beginning of the Flowering Stage: The Transition
Many growers make the mistake of thinking that once the photoperiod is changed, the plant instantly stops growing to focus only on flowers. Biologically, it doesn’t work that way.
The first phase of flowering lasts an average of 4-6 weeks. During this period, Cannabis still requires a rather high intake of nitrogen (N). The plant will continue to consume nitrogen until its structural growth has completely stopped; only at that point will the demand shift massively toward Phosphorus (P) and Potassium (K).
The Annibale Seedshop Trick: If you are growing indoors and notice that the plants are growing too tall, you can delay switching the lamp from vegetative to flowering until the 21st-25th day of flowering, keeping the white light spectrum at 6400K. This cold spectrum will help contain internodal stretching during the initial sprint.

The Cannabis Flowering Diary: Week by Week
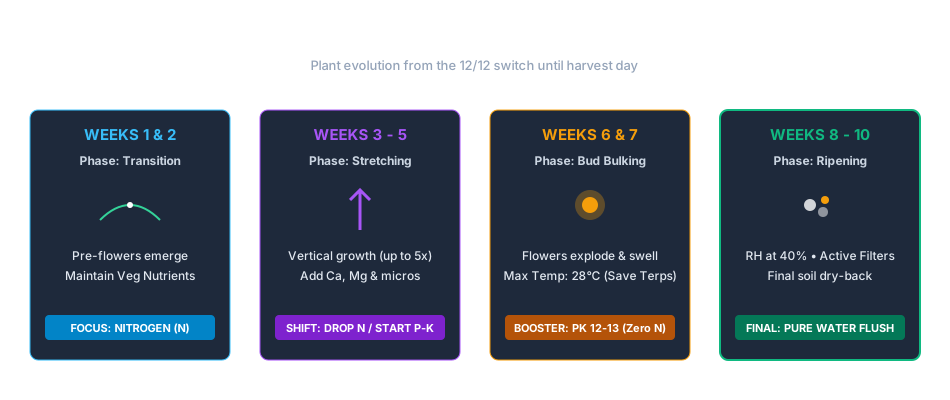
Weeks 1 & 2: The Transition Phase and Pre-flowers
Do not expect radical changes in the very first days after the switch to 12/12. The plant needs time to process the biochemical signal that communicates the end of summer.
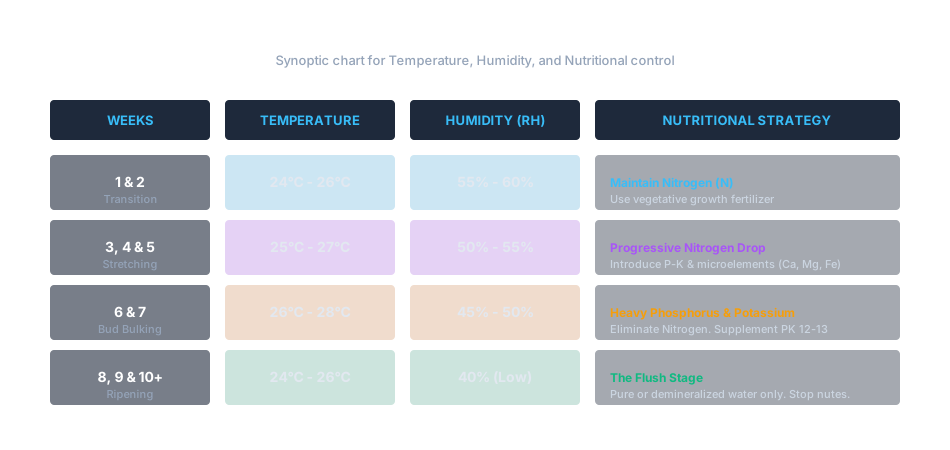
- Nutrition: Continue to administer vegetative fertilizer. Abruptly stopping nitrogen in this phase would cause severe premature deficiencies.
- What to observe: Between day 7 and 15, you will see the first “Pre-flowers” appear in the nodes between the main stem and side branches. This moment, which confirms the plant’s sex, is considered by many growers as the true “Day 1” of flowering.

Weeks 3, 4 & 5: The “Stretching” and the Explosion of New Sites
Get ready, because in this block of weeks you will witness impressive vertical growth. Under the effect of stretching, some genetics can stretch up to 5 times their initial height, with peaks of over 5 centimeters per day.
- Space management: Watch out for overcrowding. Plants that are too close create shaded areas and dangerous build-ups of humidity.
- Nutrition: Nitrogen requirement peaks to support the creation of new cellular tissues, but it will drop drastically as soon as stretching stops. Avoid using slow-release nitrogen in this phase: an excess of nitrogen in late flowering will ruin the final flavor of the flowers.
- Microelements: As soon as you see the flowers gathering into small white tufts, gradually reduce nitrogen and increase the intake of Phosphorus, Potassium, and fundamental microelements like Calcium, Iron, Magnesium, and Sulfur, which are essential for future trichome production.
The Second Phase: Advanced Flowering
The moment when the pistils begin to form dense and clearly recognizable floral structures marks the entry into the final flowering weeks. The exact week this transition occurs heavily depends on genetics:
- An Indica-dominant variety (like a Skunk) will enter final flowering as early as around the 5th week (day 35).
- A Sativa-dominant variety (like an Amnesia Haze) will require more time, roughly around the 7th week.
Indoor vs Outdoor: Outdoors, biological times are more extended. Indoors, the switch to 12 hours of light forces a fast but slightly less productive flowering. Outdoors, the gradual decline in light hours (which sits around 14 hours in late summer) ensures a slower, progressive, and decidedly more massive flowering.
Preventative Advice: Before the buds become too dense, do one last preventative treatment by spraying Neem oil. Once the buds are formed, you can no longer spray anything to avoid compromising aromas and smokeability.

Weeks 6 & 7: The Swelling of Buds and Resin
This is the most rewarding phase: the flowers increase in volume day after day and begin to be covered with a sticky and highly fragrant resin.
- Nutrition: Eliminate Nitrogen entirely. It is time to introduce robust doses of Phosphorus and Potassium using a high-quality PK 12-13 supplement.
- Climate: Strictly keep the grow room temperature below 31°C (the ideal is to stabilize at 28°C). Excessive heat would degrade volatile terpenes and flavonoids, stripping the flowers of their natural flavor.
- Patience: Resist the temptation to pluck the first small buds to taste them. Patience in these weeks will double the quality of the final product.
Weeks 8, 9 & 10: Final Maturation and the Flush
The finish line is near, but checks must become even stricter.
- Odors and Ventilation: The aroma will now be penetrating. If you haven’t already done so, connect the active carbon filters. Increase internal ventilation to avoid stagnant air.
- Impeccable Climate Parameters: Lower the temperature to 26°C and push the relative humidity down, ideally around 40%.
- Trichome Stimulation: The combination of low environmental humidity and the use of lamps with targeted UV-B emissions simulates strong environmental stress that pushes the plant to produce a defensive barrier of extra trichomes.
- The Flush (Rinsing): If visual analysis of the trichomes confirms you are about two weeks from harvesting, stop all fertilizers. Irrigate exclusively with demineralized water or decanted tap water to clean the tissues of residual salts.
- Final Hydration: In the last 3-4 days before harvesting, completely suspend watering. Letting the soil dry out fully will accelerate subsequent drying times.

Beyond the 10th Week: Managing Pure Sativas
If your garden hosts strongly Sativa-dominant phenotypes, flowering will easily exceed 10 weeks.
The same rules for reducing humidity and temperature seen previously apply, but with an extra caution: the arrival of the cold season outdoors (or winter indoors) drastically increases the risk of contracting destructive molds like Botrytis. Monitor the inside of the densest buds with extreme care.
In this late phase, you can perform a defoliation of the remaining fan leaves, improving light penetration to the lower buds and stimulating the plant to a final peak of resin production under stress.
Conclusions and Summary Pills
Flowering management requires precision. To avoid ruining months of work, always keep these key points in mind:
- No early Nitrogen cutting: Removing it on day 1 of the switch will block the structural development of the plant.
- No late Nitrogen excess: Extending it too long will ruin the aromatic profile and make combustion unpleasant.
- Humidity under control: High humidity in the last 3 weeks is equivalent to inviting mold to destroy your harvest.
- Handle with care: When checking maturation status, avoid touching the flowers directly with your fingers. The pressure breaks the trichome glands, dispersing the precious terpenes prematurely.

That’s all regarding Cannabis flowering week by week. We hope it allowed you to discover more about each week of cannabis flowering. Read our next article on “Cannabis Drying” and stay tuned!
See you soon, greetings from the Annibale Team!
Davide, CEO, Founder & Geneticist