Main-lining Technique in Cannabis Cultivation: A Strategic Guide to the Manifold
Welcome everyone, both new and loyal readers of Annibale Seedshop, to this exciting new chapter of our technical manual, today entirely dedicated to the Main-lining cultivation technique.
In the landscape of botanical engineering applied to cannabis, Main-lining undoubtedly represents one of the most geometric, rigorous, and rewarding methodologies you can implement. Although categorized as a complex technique requiring a steady hand and maximum precision, the results it offers are unparalleled: it allows you to guide the plant and transform it into a truly monumental tree, while maximizing nutrient distribution efficiency. Let’s look at how to master it best.

What Is the Main-lining Technique?
When we talk about Main-lining, we mean an advanced High Stress Training (HST) strategy designed to give the plant a perfectly symmetrical skeletal structure. This technique forces the growth of a pre-programmed number of dominant apical buds starting from a single central stem.
Main-lining is the absolute technique of choice when planning a cultivation based on the SCROG (Screen Of Green) method. While Topping and Fimming are excellent allies for expanding the canopy in a general way, Main-lining defines a stable, clean, and incredibly productive structure from the very first stages of the plant’s life. It is the perfect choice for those legally growing a limited number of specimens in a grow box but who want to exploit every single square centimeter of available light.
To understand and execute a successful Main-lining, we must first analyze its foundational element: the creation of the Manifold (the sap distribution center).
The Cannabis Manifold: The Heart of Sap Distribution
The Manifold is the physical “Y” shape that the plant must assume to lay the foundations of Main-lining. It is a surgical intervention protocol that merges the biological principles of Topping (apical pruning), LST (low stress training/gentle bending), and, subsequently, SCROG.
The biological goal of the Manifold is to reset the original apical dominance, creating a central hub where the raw sap coming from the roots is divided into perfectly equal parts toward all remaining branches. In this way, no branch will be “secondary” or disadvantaged compared to the others; no hormonal hierarchy will exist, and every bud will grow with the exact same vigor, at the same height, and with the same density.

What Are the Benefits of the Main-lining Technique?
The advantages of a scientifically applied Main-lining are both structural and economic:
- Exponential Increase in Harvest Weight: By forcing the plant to distribute energy equally across selected branches, the absorption of macro and microelements is optimized.
- Total Bud Uniformity: Forget about the small, inconsistent “popcorn” buds of the undercanopy forever. With Main-lining, you will get exclusively large, dense, and resin-rich primary buds.
- Perfect Air Circulation: Since the base of the plant (the stem below the Manifold) is completely cleared of foliage and blind shoots, air will circulate freely beneath the canopy, drastically reducing the risk of stagnant humidity, mold, or pest attacks both indoors and outdoors.
- Tight Space Management: In a standard one-square-meter cultivation area, applying this technique allows you to cover the entire lighting footprint with very few specimens, bending and directing the branches as they develop to ensure they receive perfectly uniform light radiation.

How to Apply Main-lining to the Cannabis Plant
If you have decided to take on this botanical challenge, make sure you have the correct tools at hand: ultra-sharp professional pruning shears, isopropyl alcohol for constant blade sterilization, and cotton kitchen twine (or soft LST ties) for anchoring the branches.
Phase 1: Creating the Primary Manifold (The “Y” Structure)
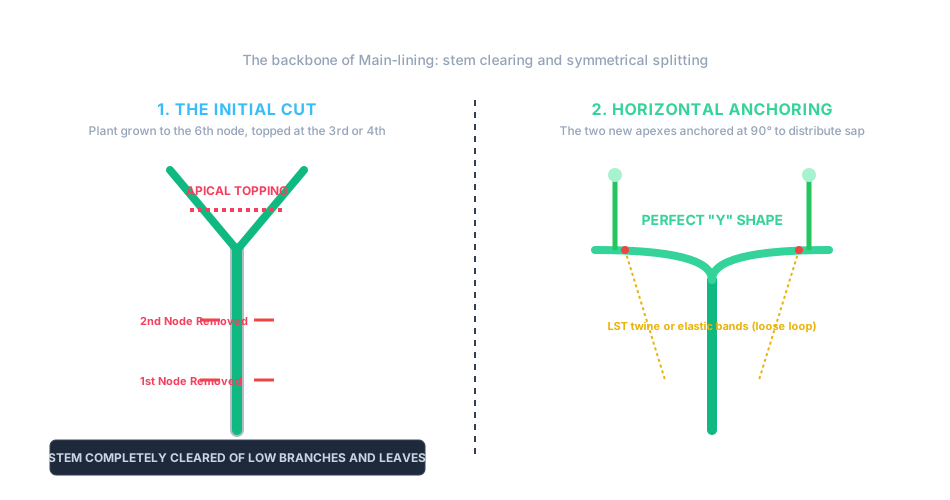
- Initial Vegetative Development: Wait for the 5th or 6th Node Let the plant grow naturally until it has clearly developed 5 to 6 alternating sets of leaves. The main trunk must show good turgor and mechanical stability.
- The First Apical Pruning: Cut Above the 3rd or 4th Node Perform a clean Topping by cutting the main stem immediately above the third or fourth internode (depending on the plant’s shape). This will become your central junction point.

- Under grow space Clearing: Removal of Lower Nodes Completely remove all lateral branches, shoots, and nodes located below the chosen cutting point. Leave only the two main fan leaves of the remaining node intact to ensure the initial photosynthetic push. The lower stem must appear completely bare: you have achieved the perfect “Y” shape.
- Horizontal Anchoring (LST): 90-Degree Bending As soon as the two new apices generated by the split have regained structural vigor, gently bend them downward in opposite directions, securing them parallel to the ground using LST ties. Keep the loop knot wide (at least half a centimeter) to avoid strangling the vascular tissues.

Phase 2: Geometric Branch Multiplication (From 2 to 8 Buds)
Once the initial “Y” structure has consolidated and the two main branches have resumed vertical growth, you will repeat the Topping operation on each of them.
- Second Symmetrical Cut: Perform a new apical pruning at the third or fourth internode of both horizontally stretched branches.
- Selective Clearing: Unlike the first phase, this time you do not need to clear the entire underlying branch. Eliminate only the first intermediate node (and the third if you pruned at the fourth), leaving the fan leaves attached to accelerate cell metabolism and recovery from shock.
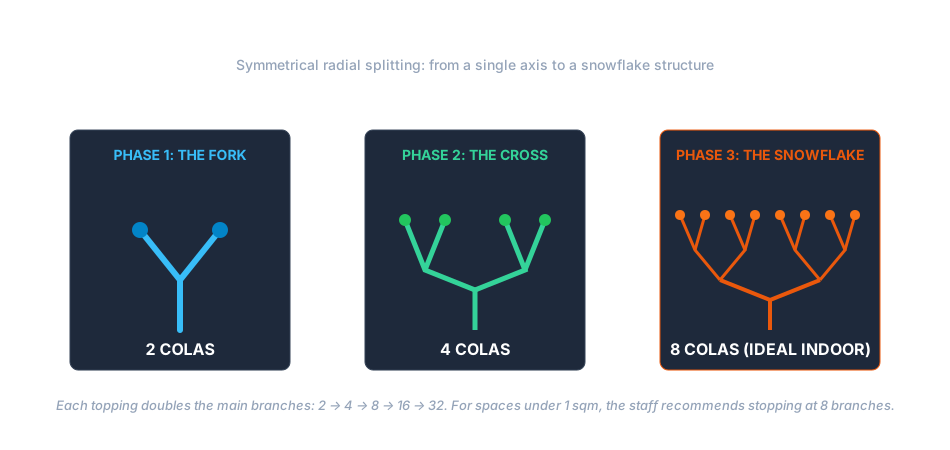
- The Snowflake Structure: This second session will lead the plant to develop 4 main structural branches. By repeating the operation one last time perfectly simultaneously on all 4 tips, you will obtain 8 dominant branches. Looking at the plant from above, the geometric layout should resemble the radial symmetry of a cross or a snowflake. This is the ideal time to place the SCROG net and spread the canopy along the horizontal grid.
Fundamental Biological Note on Progression Remember that each topping cycle mathematically doubles the number of branches: 2 → 4 → 8 → 16 → 32. The original text mistakenly hinted at a direct jump from 8 to 32 buds, but biologically an intermediate step to 16 is required. However, the Annibale Seedshop team strongly advises against pushing beyond 8 main branches if you are growing in indoor spaces smaller than one square meter. An excessive number of toppings would prolong the vegetative phase for months and cause unmanageable flower overcrowding.
Conclusions and Tips from the Annibale Seedshop Staff
Main-lining is not an inherently difficult technique: it simply requires discipline, patience, and the ability to plan according to the plant’s biological timing. It is a strategy radically opposed to the SOG (Sea of Green) method (which relies on zero vegetative time and a high number of small plants); here, you invest in the initial vegetative time of very few specimens to reap mammoth rewards.
- Patience Between Cuts: Never perform a new topping if the plant still shows signs of previous shock (leaves drooping downward or slowed growth). Always wait until the new apices have resumed vigorous growth.
- Pairing with Defoliation: During the transition phase and the first weeks of flowering, a strategic and targeted defoliation technique will help you eliminate the very few remaining shade leaves at the center of the Manifold, channeling 100% of the chemical energy toward the 8 upper buds.
- Respect the Plant’s Age: Starting Main-lining on a seedling that is too young (before the development of the 5th node) or with a weak root system will destroy the plant or permanently stunt its development. Respect nature’s timing, and the genetics will reward you with record-breaking harvests.

And that’s all for Main-lining in cannabis cultivation! Keep following us in our next article to learn more about “Indoor vs. Outdoor Cultivation“!
Greetings from the Annibale Seedshop Team!
Davide, CEO, Founder & Geneticist