Cannabis Germination Stage: How to Germinate Marijuana Seeds (Complete Manual)
Welcome to this macroscopic chapter of our Cannabis Cultivation Guide, brought to you by Annibale Seedshop & Genetics. After dissecting the secrets of how to structure the perfect substrate and analyzing water flows in pots, today we tackle the Big Bang of every crop cycle: the germination phase.
Many growers mistakenly believe that purchasing top-tier genetics is enough to guarantee mind-blowing buds. The reality teaches us otherwise: a seed is a biological embryo enclosed in a state of cryogenic dormancy. Breaking this dormancy incorrectly means compromising the plant’s phenotypic expression, causing stable cellular malformations, or in the worst-case scenario, killing the seedling before it can even see the light of the sun or grow room lamps.
In this cornerstone guide, we will combine our internal laboratory procedures with empirical evidence discussed in international channels and the most historical forums of the industry. Get ready to master the biology of the rhizosphere from day one.

Anatomy and Physiology of the Cannabis Seed: The Green Gold
To understand how to activate a seed, we must first comprehend what happens inside it from a macrobiotic perspective. The Cannabis seed consists of a protective woody outer shell (pericarp), which encloses the actual embryo, surrounded by the endosperm—a reserve of complex nutrients (starches and fats) that will feed the seedling until the appearance of the first photosynthetic cotyledons.
The Value of Conscious Self-Growing
Anyone who consumes or studies this plant knows well that weed grown with your own hands is infinitely cleaner, more controlled, healthier, and more rewarding than any flower available on parallel markets or standard commercial channels.
Growing from seed allows you to track every single molecule administered to the plant, ensuring a pure final product. Even though European regulatory frameworks still present gray areas and fluctuating bureaucratic interpretations regarding personal consumption, preserving and germinating seeds for collection, genetic study, or medical purposes remains the fundamental pillar for safeguarding the biodiversity of this plant species.
The Environmental Trinity: Temperature, Humidity, and Oxygen
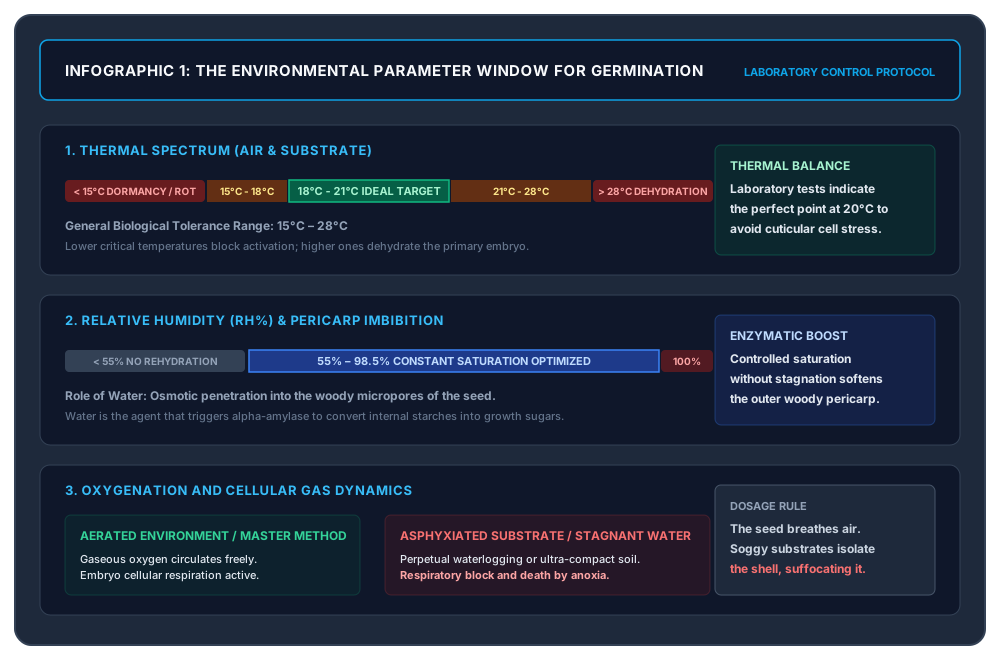
Germination is not a chemical process induced by fertilizers, but an enzymatic activation triggered exclusively by precise environmental physical signals. This process is called imbibition.
- Relative Humidity (RH): It must be constant and maintained within a range shifting between 55% and 98.5%. Water must penetrate the micropores of the woody pericarp to hydrate the endosperm. Without this saturation, internal enzymes (such as alpha-amylase) cannot activate to convert starches into ready-to-use sugars for root elongation.
- Optimal Temperature: The biological tolerance spectrum ranges from 15°C to 28°C. However, laboratory tests show that the perfect thermal equilibrium point sits strictly between 18°C and 21°C. Temperatures below 15°C induce the seed into a state of fungal latency (promoting rot); temperatures above 28°C accelerate cellular dehydration before the main taproot can anchor itself.
- Oxygenation: The seed breathes. During the cracking of the shell, the supply of gaseous oxygen is vital. Asphyxiated substrates or permanent immersion in stagnant water block cellular respiration, causing the embryo’s death by anoxia.
The Chemistry of Irrigation Water: pH and EC in Germination
Water isn’t just for wetting; it is the chemical vehicle that regulates the interaction between internal nutrients and the surrounding environment. Calibrating water parameters in this phase is an absolute obligation, especially if you operate in advanced commercial or therapeutic setups.
Millimetric pH Management
The pH determines the solubility of mineral elements and the stability of primary cell walls. To monitor it professionally, using a calibrated dual-point digital meter is mandatory.
- Hydroponic and Aeroponic Systems: In this soilless configuration, the pH must be kept stable within a tight range between 5.8 and 6.0. A higher value would block iron absorption, while a lower value would destabilize embryonic tissues.
- Soil Grows: Soil possesses a natural buffering capacity, but the first irrigation water should sit around a pH of 6.2.
- Pure Coco Coir: Coco does not have a stable buffering capacity. In this delicate transition phase, the pH of the rehydration water must strictly hover between 5.8 and 6.3.
EC (Electrical Conductivity) Management
EC measures the total concentration of dissolved mineral salts in the water. An EC that is too high creates negative osmotic pressure outside the seed: instead of penetrating the embryo via capillarity, water is literally “extracted” out of the seed, dehydrating it before it opens.
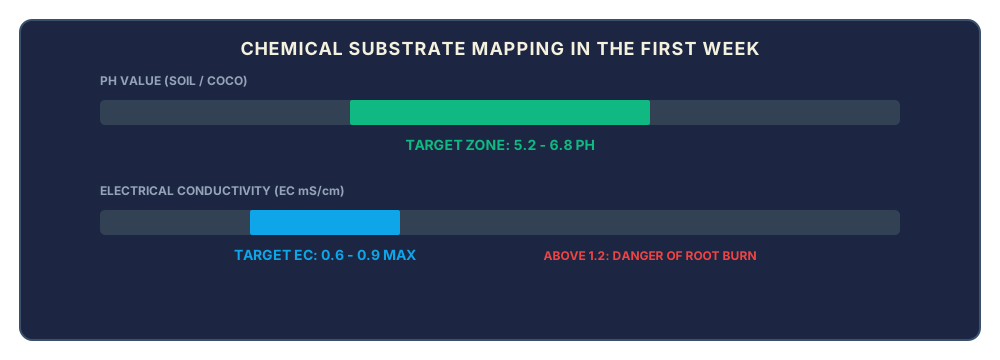
The Annibale Target: During the entire germination phase and for the first 7 days of the seedling’s life, the EC value of the irrigation water must remain between a minimum of 0.6 mS/cm and a maximum of 0.9 mS/cm. Any addition of liquid chemical fertilizers during this phase is punished with the swift death of the root hairs.

Comparing the 3 Germination Methods: Operational Protocol
Let’s review the three methodologies most used by global growers, analyzing their pros, structural cons, and correct execution in the field.
A. The Classic “Directly into the Soil” Method
This consists of placing the seed directly into the final pot or small cellular plug trays.
- How to proceed: Make a small hole at most half a centimeter deep (0.5 cm). Insert the seed and cover it with a very light layer of fluffy soil without pressing. Pre-hydrating the seed by placing it in a glass of water for 12 hours before planting can accelerate the initial push.
- Annibale’s take: This is the method closest to nature, but it is also the one we least recommend to beginners. It offers zero visual control over the hatching. If the soil compacts, if the depth is wrong, or if hidden water pools form in the pot, the seed will rot without you noticing. Even for those planning outdoor cultivation in open ground or Guerrilla projects in the woods, protected indoor germination in small pots is a mandatory choice to safeguard fragile plants from insect attacks or sudden temperature swings.
B. The “Glass of Water” Method
A popular system due to its extreme logistical simplicity.
- How to proceed: Submerge the seeds in a glass of declorinated water at a controlled temperature (20°C), leaving them in complete darkness. Usually, within 24-48 hours, the shell opens, showing the bright white tip of the root.
- Annibale’s take: While useful for softening particularly hard pericarps or old seeds, it remains less efficient and safe than the paper towel method. Leaving the seed fully submerged past the opening of the shell exposes the newborn root to acute oxygen deprivation, triggering early root rot phenomena.

C. The Master Method: “Annibale – Paper Towel and Cellophane”
According to our team’s efficiency standards, this is by far the most reliable, secure, and top-performing system in the industry. It ensures constant humidity saturation combined with perfect local oxygenation.
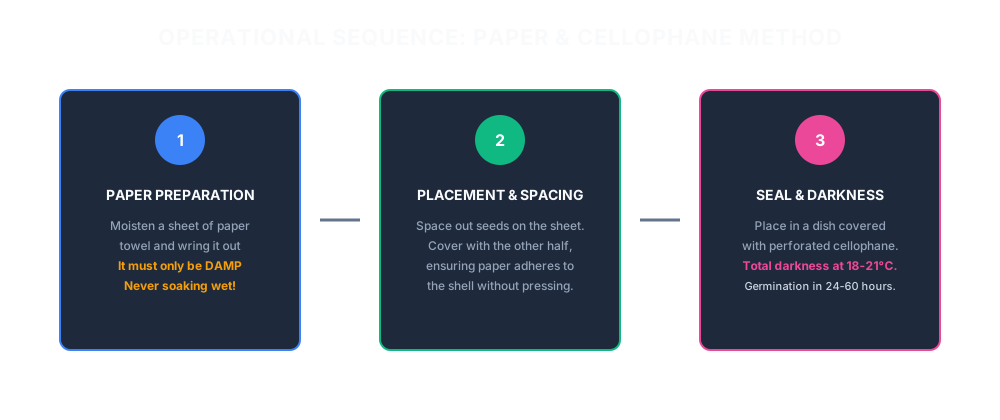
- Hydration and Calibration: Take a sheet of uncolored, unscented kitchen paper towel. Fold it in two, wet it with pH-calibrated water, and squeeze it thoroughly with your hands to remove every single drop of excess water. You should get a uniformly thick, damp but non-dripping paper towel.
- Placement: Gently lay the seeds on one half of the paper towel, making sure to space them at least 2-3 cm apart. Fold the second half of the paper over the seeds, applying very light, millimetric pressure with your fingertips to make the damp cellulose adhere perfectly to the seed shell.
- Osmotic Sealing: Place the structured paper towel inside a deep plate. Entirely cover the top of the plate with cellophane (transparent cling wrap), poking 3 or 4 small holes with a toothpick to allow oxygen circulation. If you don’t have plastic wrap, simply use a second deep plate turned upside down over the first, creating a sealed containment chamber.
- Waiting in the Dark: Place the plate in a completely dark and warm place (constant temperature of 20°C). Check the condition of the seeds every 12 hours: within a timeframe ranging between 24 and 60 hours, the shells will split open, releasing the taproot. When the root reaches a length of 3-5 millimeters, immediately transfer the seed to the pot, placing it in the micro-hole a few millimeters deep, with the root tip pointing downward.
Lighting Infrastructure: Spectral Management of the Newborn Seedling
The seed in the very early stage of shell cracking does not need light (the process is photophobic). However, as soon as the hypocotyl emerges from the substrate raising the two cotyledons, the lighting setup becomes the primary metabolic switch.
The Energy Over-Illumination Mistake
Is it possible to use a 600W HPS lamp, an MH or an industrial LED panel dialed to the max to illuminate a three-day-old seedling? The technical answer is yes, but it is highly inefficient management. In the best-case scenario, you’ll set up a massive waste of electricity on your bill; in the worst-case scenario, the photon pressure (PPFD) and thermal radiation will be so destructive that they will instantly dehydrate the delicate leaf tissues, causing a cellular development stall or the seedling’s death by drying out.
Professional Cool-Spectrum Solutions
Young seedlings need moderate light intensity but rich in blue frequencies, capable of stimulating internodal compactness and preventing the plant from stretching excessively in search of light (spindling).
- White Light Neons / T5 Systems: Perfect if you are managing small cultivation volumes (up to 4 or 6 plants). They have almost zero thermal emission, allowing you to position the light source just a few centimeters from the tops.
- CFL Lamps (Compact Fluorescent Light): The choice of preference for selection labs. We recommend adopting CFL bulbs dedicated to the vegetative stage with a fixed white/blue spectrum at 6400°K. This spectrum faithfully reproduces natural spring light, ensuring short internodes and robust stems from the very first hours of photosynthesis.
The Ideal Substrate for the First Root Steps
The growing medium that welcomes the newly sprouted seed must meet precise physical and chemical requirements. There is no perfect substrate in an absolute sense, but there is the correct structural configuration:
- Absence of Mineral Nutrients: The initial substrate must strictly be unfertilized (Light Mix). Using heavy, pre-fertilized soil or residues from previous crops saturated with salts will destroy the root’s cell membranes via osmotic shock.
- Porosity and Capillary Drainage: The medium must be light, fluffy, and perfectly aerated to prevent root asphyxiation while maintaining a constant veil of moisture around the taproot. To delve deeper into using inert mineral amendments and avoid dosing errors, we invite you to consult our specialist guide: Guide to Using Perlite, Vermiculite, and Expanded Clay in Substrates, thereby avoiding chemical redundancies or overlaps in your homemade mixes.
- Standard pH Values: The chemical range of the starting soil must stand between a pH of 5.2 and 6.8, ensuring microbiological stability for the newborn rhizosphere.
The 10+1 Fatal Germination Mistakes: Clinical Analysis
Here is the decalogue of the most frequent mistakes recorded daily in beginner communities. Memorize it to avoid compromising your genetic investments:
- Excessive prolongation of germination in the air: Letting the root grow too much inside the paper towel (beyond 1-2 cm) exposes the delicate root hairs to mechanical trauma and devastating light shock during transplantation.
- Dehydration of the substrate surface: Allowing the top layer of the soil to dry out completely even for just two hours will irreversibly block hypocotyl elongation.
- Premature drying of the paper towel: If you forget the plate out in the open without the cellophane seal, the paper will lose moisture rapidly, cementing the embryo inside the partially open shell.
- Incorrect sowing depth in the pot: Burying the seed deeper than 1 cm will force the seedling to deplete all the energy reserves of the endosperm before it can reach the surface, causing its underground death.
- Too frequent watering (Perennial Saturation): Continuously wetting the soil without allowing dry cycles eliminates oxygen from the pores, causing taproot rot and the onset of Damping-Off (seedling die-off).
- Incompatibility of thermohydrometric parameters: Operating in cold environments (below 15°C) or in hot, dry grow rooms disrupts the plant’s hormonal flows.
- Incorrect geometric placement of the seed: Inserting the seed into the hole with the root tip pointing upward forces the plant to perform an exhausting “U-turn” rotation, delaying its emergence from the soil.
- Multiple sowing in the same container: Planting two or more seeds within the same pot will trigger immediate root competition for space and oxygen, cutting the growth performance of both specimens in half.
- Incorrect distance from the light source: Keeping lights too far away causes stem stretching (making it spindly until it snaps under its own weight); keeping them too close burns the cotyledons due to radiant stress.
- Administering fertilizers in the very early stages: Integrating liquid fertilizers or mineral stimulators in the first few days destroys the root system. The seedling already possesses all the necessary nutrition within the cotyledons for the first 7-10 days of life.
- Continuous tactile manipulation of the seeds: Constantly touching the seeds with bare fingers during the hatching phase introduces pathogenic bacteria and snaps the microscopic newborn root hairs. Let nature work in peace.

FAQ: Frequently Asked Questions on the Cannabis Seed Germination Phase
How can I tell a viable seed from a sterile one before starting?
A healthy, mature Cannabis seed looks visually compact, hard to the touch, and covered in a shiny shell with dark or tiger-like stripes (brown, gray, or black). White, light green seeds, or those that crush easily under light pressure between your fingertips are immature, lack a developed endosperm, and are consequently sterile.
Is it better to use distilled water or tap water to wet the paper towel?
The ideal option is using RO (Reverse Osmosis) or distilled water cut with a small percentage of declorinated tap water to reach a starting EC of about 0.4-0.6 mS/cm. Pure distilled water lacks mineral salts and has an aggressive osmotic pressure that can stress embryonic cells. Untreated tap water, on the other hand, contains chlorine and chloramines—powerful chemical disinfectants that inhibit the seed’s enzymatic activation.
What should I do if the seed shell gets stuck on the first leaves (cotyledons)?
This phenomenon occurs when the substrate is too fluffy or the planting depth is insufficient: the seed emerges without encountering the mechanical friction of the soil necessary to slide the shell off. If the shell is still blocking the cotyledons 24 hours after emergence, humidify the area by placing a drop of warm water to soften the woody tissues. Then, using two sterilized laboratory tweezers and proceeding with extreme gentleness, slide the shell off to free the photosynthetic leaves.
Do autoflowering varieties require different precautions in germination compared to photoperiod ones?
Yes, regarding transplantation. Autoflowering varieties have a life cycle rigidly programmed by their genetic clock (usually flowering 3-4 weeks from germination). Any root stress or growth stall caused by an incorrect transplant will permanently reduce the plant’s final size. For this reason, the Annibale team recommends germinating autoflowering seeds using the paper towel method and transferring them, as soon as the root appears, directly into the final pot (from 11 to 18 liters), eliminating subsequent transplant shocks.
Is using a heating mat mandatory during winter?
It is highly recommended if the room you operate in does not have stable ambient heating at 20°C. Heating mats keep the base of the plate or germination dome at a constant temperature. Watch out though: placing the plate in direct contact with the mat can cause the substrate to overheat (above 30°C) and cause immediate moisture evaporation. Always place a small spacer (a towel or a plastic tray) between the mat and the seed container to spread the heat evenly.
How long should the root be before transferring the seed into the substrate?
The ideal geometric length for transfer ranges between 3 and 5 millimeters. Waiting until the root exceeds a centimeter exponentially increases the risk of breaking it during handling or placing it with an incorrect orientation in the soil, compromising the verticality of the stem.
What is the “spindling” (stretching) phenomenon of the seedling and how is it corrected?
Spindling manifests when the stem of the young seedling elongates abnormally, becoming thin, white, and fragile. This happens because the light source is too far away or has an unsuitable spectrum: the plant spends all its energy on vertical elongation to intercept photons. To correct it, immediately bring the CFL lamp closer or adjust the LED lamps dimmer. During the next transplant, bury the seedling to cover most of the slender stem, leaving only the cotyledons out of the soil: the buried portion of the stem will develop new adventitious roots over time.
Can I use liquid root stimulators (Root Stimulator) during germination?
In the imbibition phase (towel or glass), it is preferable to use exclusively pure calibrated water. You can integrate very small doses of organic root stimulator based on humic acids or kelp only starting from the first irrigation in the pot, provided this does not raise the EC value beyond the safety threshold of 0.8-0.9 mS/cm. Organic root stimulators do not contain burning mineral macronutrients, but natural hormones that facilitate lateral branching.
How does using carbon dioxide (CO2) affect this specific phase?
Artificial CO2 supplementation in the grow room is an extraordinary tool for increasing biomass during the advanced vegetative phase and explosive flowering. However, in the germination phase, CO2 integration is totally useless, if not counterproductive. The seed in the hatching phase consumes oxygen and does not yet perform active chlorophyll photosynthesis. CO2 delivery systems must remain turned off until the first true leaf stages appear.
After how many days of failing to hatch can a seed be considered definitively dead?
If you have scrupulously followed the thermal and water parameters of the Annibale method, the vast majority of viable seeds hatch within 48-72 hours. Some genetics characterized by an exceptionally thick woody pericarp may require up to 6-7 days. If after 10 continuous days spent in perfect humidity and temperature conditions the seed shows no cracking or if, opening slightly, it shows a yellowed or dark internal embryo, the seed is to be considered biologically dead or sterile.

That’s all for this chapter on how to germinate a Cannabis seed, but we want to leave you with one last piece of advice, hoping that reading this article was helpful. Handling seeds and seedlings as little as possible can be the simplest trick for successful Marijuana germination.
Keep following us in our next article on the best substrate for growing Cannabis. Greetings from the Annibale Seedshop team, see you next time!
Davide, CEO Founder & Geneticist